
Pruning
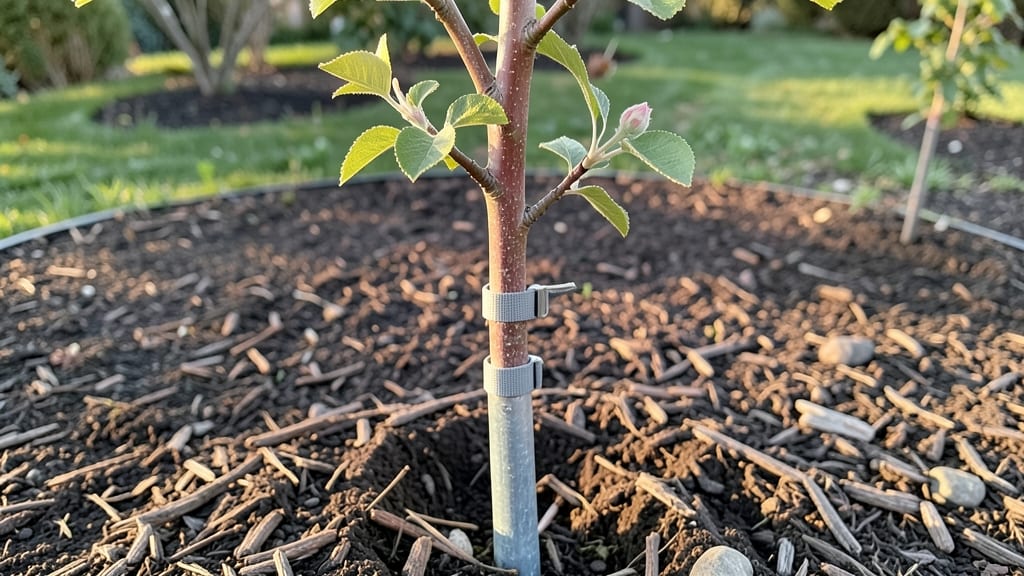
When young trees sway dangerously in wind or storms, a sturdy tree brace support can mean the difference between a thriving canopy and a snapped trunk. 🌳 I’ve seen firsthand how a simple tree brace transforms a wobbly sapling into a confident, storm-resistant plant—here’s exactly how to do it right.
The key is matching the support to your tree’s needs: flexible spiral wraps for gentle guidance, rigid metal stakes for heavy canopies, or wooden braces for long-term stability. Most gardeners overlook the angle—installing at a 45-degree from the trunk prevents girdling as the tree grows.
You’ll notice the difference within weeks: straighter growth, fewer storm-related injuries, and a trunk that thickens faster. The right brace even reduces the need for future cabling as the tree matures.
For mature trees, consider tree guards or cabling instead—these distribute weight better than braces. But for young or weak trees, a properly installed brace is your best defense against wind damage.
📚 In This Guide
- What you need
- Instructions
- Tips and common mistakes
- Wrapping up and next steps
What you need
- ● Tree brace kit (or DIY materials): 1–2 steel or aluminum braces (adjustable or fixed, 3/8"–1/2" thick, 6–10 ft long)
- ● 1–2 tree straps (wide, padded, 1"–2" thick, rated for 500+ lbs)
- ● 4–6 heavy-duty screws or lag bolts (1/4"–3/8", galvanized or stainless steel)
- ● Support stakes (2–4, 2x4 or 4x4 lumber, pressure-treated, 6–8 ft tall)
- ● Concrete or ground anchors (2–4, for securing stakes, or heavy-duty stakes with spikes)
- ● Tree wrap or protective padding (to prevent bark damage)
- ● Drill/driver (with screw/bolt bits)
- ● Measuring tape (25+ ft for accuracy)
- ● Level (to ensure braces are straight)
- ● Hacksaw or reciprocating saw (if cutting lumber)
- ● Gloves & safety goggles (protection is key!)
- ● Adjustable turnbuckles (for tensioning braces on larger trees)
- ● Tree growth spray (to monitor brace fit over time)
- ● Extra straps or ratchet ties (for reinforcement)
- ● Post-hole digger (if setting permanent anchors)
Step-by-Step guide to installing tree brace supports
Here's how I reinforce young trees or damaged branches—no guesswork, just structural stability.
🪴 Step 1: Assess the Tree and Select Brace Type
Start by examining the tree's structural weaknesses. Look for leaning trunks, cracked bark, or branches with splits wider than 1/3 the branch diameter. For young trees, I use tree straps or flexible metal bands to guide growth upright. For damaged branches, cable-and-brace systems work best—think of them as a scaffold for the tree's natural structure.
Measure the trunk diameter at the point of concern. Most braces require a minimum 4-inch diameter for proper fit. If the trunk is too small, consider using a tree stake with a soft collar to avoid girdling. I always check for rot or pest damage before installing anything—if the wood is soft or hollow, the tree needs more than just a brace.
🌿 Step 2: Install the Brace System Correctly
Begin by positioning the brace at the weakest point, usually where the trunk meets the first major branch or where a split occurs. For metal bands, wrap them snugly but not tightly—you should be able to slide a finger between the band and the trunk. Over-tightening can girdle the tree and strangle its growth. I like to use tree straps with rubber padding to prevent abrasion.
For cable-and-brace systems, drill 1/4-inch holes at a 45-degree angle through the branch and into the trunk. Insert stainless steel cables through the holes, then tighten them gradually with a ratcheting strap. The goal is to compress the split just enough to close the gap—think of it like a cast for a broken bone. Always leave room for the tree to swell slightly during wet seasons.
✂️ Step 3: Secure with Proper Anchoring
Anchor the brace system to the ground using stakes driven at least 12 inches deep. For young trees, I use three stakes positioned 120 degrees apart around the trunk, connected to the brace with elastic straps. This allows the tree to sway slightly in wind, which actually strengthens its trunk over time. Avoid rigid staking—it turns trees into brittle poles.
Check the tension weekly during the first month. Trees grow, and so should your brace system. Loosen straps slightly if the tree appears to be growing into the brace. I also inspect for rubbing or fraying—if the brace is cutting into the bark, pad it immediately with tree-friendly foam to prevent damage.
☀️ Step 4: Monitor and Adjust Seasonally
After installation, watch for signs of stress or improper fit. Leaning or twisting growth means the brace isn't guiding the tree correctly. In early spring, before new growth starts, I check all bolts and straps for corrosion or loosening. Stainless steel hardware lasts years, but aluminum can rust quickly in wet climates—replace it if you see any pitting.
Remove temporary braces after 2-3 growing seasons, unless the tree has a permanent structural issue. I always cut the straps with pruning shears and leave the hardware in place—it won't harm the tree, and it's easier to reattach if needed. For mature trees with permanent braces, inspect them annually for loose cables or cracked hardware.
Tips & tricks for tree brace support
Here's what I've learned from years of reinforcing trees—these details make all the difference between a temporary fix and lasting stability.
Material Selection Matters: When choosing between tree straps and cable-and-brace systems, consider the tree's age and damage severity. For young trees with no structural issues, flexible metal bands are ideal—they allow natural trunk expansion while providing gentle guidance. For mature trees with splits, cable systems offer superior compression strength, but only if you use stainless steel cables (aluminum corrodes too quickly). I've seen aluminum braces fail within two seasons in wet climates, so it's worth investing in the right materials upfront.
The 45-Degree Drilling Technique: In Step 2, when drilling holes for cable systems, that 45-degree angle isn't arbitrary—it creates a mechanical advantage that distributes compression forces more evenly. Use a 1/4-inch drill bit with sharp teeth to prevent splintering. I like to mark the drill path with a pencil first, then pre-drill a starter hole to guide the angle. This prevents the bit from wandering and ensures clean holes that won't tear the bark.
Anchoring Depth is Critical: Those 12-inch deep stakes in Step 3 aren't just a suggestion—they're essential for wind resistance. In my experience, stakes shorter than 10 inches often pull out during storms. For trees in exposed locations, I recommend using three stakes arranged in a tripod formation, connected to the brace with elastic straps rather than rigid hardware. This flexible anchoring mimics natural sway patterns and actually strengthens the tree over time.
Seasonal Maintenance Calendar: Mark your calendar for these key checkpoints: early spring (before new growth), mid-summer (after heavy rains), and late fall (before winter winds). In early spring, I check for corrosion on aluminum hardware and tighten any loose straps. Mid-summer inspections focus on bark condition—if you see rubbing marks, add tree-friendly foam padding immediately to prevent girdling. Fall is the best time to adjust tension for winter wind loads.
Pro Tips for Tree Brace Support
- Here's what I've learned from years of reinforcing trees—these details make all the difference between a temporary fi...
- Material Selection Matters: When choosing between tree straps and cable-and-brace systems, consider the tree's age an...
- The 45-Degree Drilling Technique: In Step 2, when drilling holes for cable systems, that 45-degree angle isn't arbitr...
Frequently asked questions
Got questions about tree brace support? You’re not alone! Here are some of the most common inquiries—and straightforward answers—to help you make the best decisions for your heavy-canopy trees.
When should I install a tree brace support?
Install a tree brace before signs of stress appear—like leaning, cracked bark, or visible splits in the trunk. If your tree already has structural damage (e.g., co-dominant stems or weak branch unions), act immediately. For healthy but heavy trees (e.g., oaks, maples), consider braces during late winter or early spring when the tree isn’t actively growing.
What’s the difference between a tree brace and a cable?
Both provide support, but they serve different needs:
- Tree brace: A rigid, U-shaped or full-wrap support (often metal or composite) that stabilizes the trunk or major branches. Best for preventative support or trees with slight structural flaws.
- Cable: A flexible system (e.g., dynamic cables) used for corrective support, like guiding a leaning trunk or reinforcing a split. Cables distribute weight better for severe issues.
Use a brace for proactive care; cables for active stabilization.
Are tree braces expensive? What’s the cost?
Costs vary based on material, size, and tree height. Basic steel braces start around $50–$150, while custom-fitted or composite braces can run $200–$500+. DIY installation saves labor costs, but professional fitting (especially for tall trees) is highly recommended to avoid damage. Think of it as an investment in your tree’s longevity!
Can I install a tree brace myself, or do I need a pro?
You can DIY for small trees or minor support, but proceed with caution:
- DIY-friendly: Lightweight braces for young trees or branches under 6 inches in diameter.
- Call a pro: For trees over 30 feet tall, multiple co-dominant stems, or existing damage. Improper installation can worsen structural issues.
If unsure, consult an ISA-certified arborist—they’ll assess risks and ensure the brace doesn’t strangle the tree over time.
How long can a tree brace last? Do I need to replace it?
With proper installation, a high-quality tree brace can last 10–20 years, but check it annually for:
Replace braces if they show visible wear or if the tree’s condition changes (e.g., new splits). Never leave a failing brace on—it can do more harm than good!
Wrapping up and next steps
Investing in tree brace support is a proactive way to protect your heavy-canopy trees from structural stress, wind damage, and long-term decline. Whether you’re dealing with mature oaks, towering pines, or fruit-bearing giants, these supports provide peace of mind while preserving your landscape’s beauty. 🌳✨
Ready to take action? Start by assessing your trees’ needs—consult a certified arborist for a professional evaluation, then gather the right materials (like tree straps, cables, or rods) to create a sturdy, long-lasting solution. Your trees (and future generations!) will thank you.