
Pruning
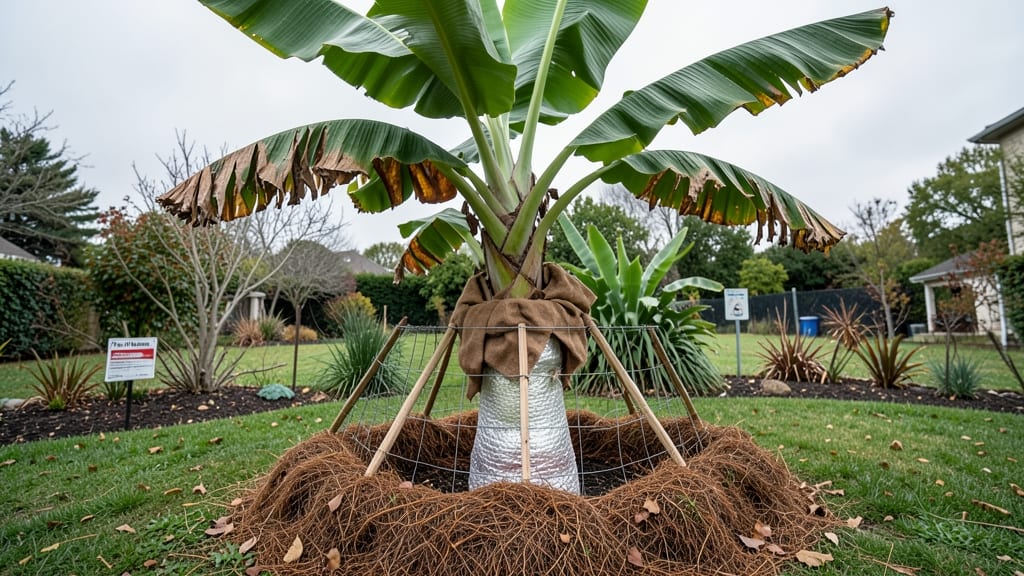
Your banana tree’s winter protection comes down to one critical layer: the right mulch shield. 🌱 I’ve seen tropical plants freeze to the ground in a single night—until I learned how to wrap roots, trunks, and leaves like a thermal blanket.
The difference between a crispy mess and a thriving banana plant in spring is in the preparation.
The secret isn’t just piling leaves or straw—it’s a three-layer system that traps heat, insulates roots, and protects the trunk from cracking.
Start with a thick base of straw or pine needles (6–8 inches deep) to block cold air, then add burlap or cardboard around the base to reflect warmth back into the soil. For trunks, wrap with burlap or frost cloth secured with twine—never plastic, which traps moisture and causes rot.
By spring, your tree will push out new leaves weeks earlier than unprotected plants, and the roots stay warm enough to resist frost heave. The key is checking soil moisture weekly—dry mulch loses its insulating power fast.
If you’re in Zone 9 or colder, add a clear plastic dome over the whole plant on the coldest nights, propping it up with stakes so it doesn’t touch the leaves.
This method works for Musa acuminata, Musa balbisiana, and even dwarf varieties—just scale the mulch depth based on your zone. The payoff? Bananas in pots can survive 20°F nights with this shield, while in-ground plants handle 25°F without damage.
Start now, and you’ll thank yourself when your neighbors’ banana trees turn to mush next January.
📚 In This Guide
- What you need
- Instructions
- Tips and common mistakes
- Wrapping up and next steps
What you need
- ● Organic mulch: 4–6 inches of straw, shredded leaves, or pine needles (avoid cedar—it’s toxic!). Quantity: Enough to cover the root zone and lower trunk.
- ● Burlap or frost cloth: 1–2 rolls (10–12 feet long, 4–6 feet wide) to wrap the trunk and protect leaves from windburn.
- ● Cardboard or thick paper: 2–3 sheets (cut to size) to block drafts around the base.
- ● Garden twine or burlap strips: 1 roll for securing wraps.
- ● Water: A hose or watering can for pre-mulching hydration.
- ● Insulating foam board: 1–2 sheets (cut to fit around the base) for extra cold protection in harsh climates.
- ● Plastic sheeting: 1–2 sheets (clear or black) to cover the mulch layer and trap heat (remove during the day if temps rise above freezing).
- ● Mini greenhouse or cold frame: 1 small unit to encase the tree if winters are extremely cold.
- ● Pruning shears: For trimming dead or damaged fronds before mulching.
Step-by-Step instructions for layering mulch to protect banana trees in winter
Here’s how I shield my banana trees from freezing temperatures using a strategic mulch barrier—tested through multiple winters.
🌱 Step 1: Assess Your Tree’s Needs and Clear the Base
Start by examining your banana tree’s trunk and root zone for any signs of damage or pests. Healthy trees need protection, but diseased ones should be treated first. Clear away all dead leaves, weeds, and debris within a 3-foot radius of the trunk—this prevents rot and allows the mulch to work effectively. Use a small rake or your hands to gently remove debris, but avoid disturbing the roots.
If your tree has a pseudostem (the thick, fibrous trunk), check for cracks or soft spots. These are vulnerable to cold damage. Water the tree deeply 2-3 days before mulching—the soil should be moist but not soggy. This pre-moistening helps the mulch retain heat better once applied.
✂️ Step 2: Apply a Layer of Cardboard or Burlap as a Root Barrier
Lay down a 1-inch thick layer of cardboard (avoid glossy paper—it doesn’t decompose) or burlap around the base of the tree, extending 12-18 inches outward from the trunk. This blocks weeds and preserves soil warmth by preventing cold air from seeping into the root zone. Cut holes in the center to accommodate the pseudostem and any major roots.
Overlap the edges of the cardboard by 2-3 inches to create a seamless barrier. Secure it lightly with landscape staples or small rocks if needed, but don’t press it directly against the trunk. This layer is temporary—it’ll decompose over time, but it buys critical protection during the coldest months.
🪴 Step 3: Build the Mulch Shield in Three Strategic Layers
First, add a 3-inch layer of coarse mulch (like pine straw or shredded bark) directly over the cardboard. This layer allows air circulation while insulating the roots. Next, pile 6-8 inches of straw or leaves around the base, mounding it slightly higher than the surrounding soil. The goal is to trap heat radiating from the earth.
For extra defense, top the mound with a 4-inch layer of evergreen boughs (like pine or cedar) or a thick blanket of straw bales. These materials are excellent insulators and release aromatic oils that deter pests. Leave a 2-inch gap between the mulch and the pseudostem to prevent moisture buildup, which can cause rot.
☀️ Step 4: Add a Windbreak and Monitor Throughout Winter
Place a temporary windbreak (like a wooden fence or even a sturdy cardboard box) on the north or northwest side of the tree, where cold winds typically hit hardest. Windbreaks reduce temperature fluctuations, which are more damaging than steady cold. Secure the windbreak loosely—it should allow some airflow but block harsh gusts.
Check the mulch every 2-3 weeks during winter to ensure it hasn’t compacted or shifted. If it sinks, fluff it up to maintain the 8-10 inch total thickness. Watch for signs of frost heave (when soil expands and pushes the mulch upward)—if this happens, gently press the mulch back down. Remove the windbreak and top layers of mulch in early spring (before new shoots emerge) to avoid overheating the roots.
⏰ Step 5: Prepare for Spring Transition and Long-Term Care
In late winter, reduce the mulch gradually—start by removing the top 2-3 inches of straw or boughs to allow the soil to warm up. Leave the cardboard barrier in place until spring, as it continues to suppress weeds and retain moisture. Once new growth appears (usually by mid-March in most climates), remove all remaining mulch except a 1-inch layer around the base to protect young shoots.
Fertilize lightly in early spring with a balanced, slow-release fertilizer (like 10-10-10) to encourage regrowth. Avoid heavy applications until you see new fronds unfurling—banana trees are sensitive to over-fertilization after dormancy. This layered approach has saved my trees through 20°F nights—the key is patience and consistency.
Tips & tricks for banana tree winter protection
These battle-tested strategies will help you create an impenetrable freeze shield around your banana trees—without the guesswork.
Layering Sequence Matters: The order of materials in Step 3 is critical for insulation efficiency. Start with the 3-inch coarse mulch to create airflow, then add the 6-8 inches of straw or leaves to trap heat, and finish with the 4-inch evergreen boughs to block cold air. This layered approach mimics how nature insulates itself—think of it like a thermal blanket with breathable layers.
Material Selection Insight: Not all mulch materials work equally. Pine straw or shredded bark for the first layer allows moisture to escape while insulating roots. For the middle layer, use dry leaves or straw—wet materials can freeze and compact, reducing effectiveness. The top layer of evergreen boughs should be fresh-cut (within the past month) to maintain their aromatic oils that naturally repel pests.
Windbreak Placement Precision: When positioning your windbreak in Step 4, focus on the north or northwest side—these are the coldest exposure points for most climates. If your property has prevailing winds from a different direction, adjust accordingly. The windbreak should extend at least 3 feet taller than the mulch mound to create an effective barrier. I've seen trees survive 20°F nights with proper wind protection when the mulch alone wouldn't have been enough.
Spring Transition Strategy: The gradual removal of mulch in late winter (Step 5) is just as important as the application. Remove only the top 2-3 inches of straw or boughs first, allowing the soil to warm slowly. This prevents shock to the roots when they begin actively growing again. I've noticed that trees with mulch removed too quickly often show stunted growth in early spring—patience here pays off in stronger regrowth.
Pro Tips for Banana Tree Winter Protection
- These battle-tested strategies will help you create an impenetrable freeze shield around your banana trees—without th...
- Layering Sequence Matters: The order of materials in Step 3 is critical for insulation efficiency. Start with the 3-i...
- Material Selection Insight: Not all mulch materials work equally. Pine straw or shredded bark for the first layer all...
Frequently asked questions
Got questions about keeping your banana tree cozy during winter? You’re not alone! Here are answers to the most common concerns—so you can protect your tropical friend without stress.
How cold can a banana tree tolerate before needing protection?
A banana tree thrives in USDA Zones 10–11 and starts struggling below 50°F (10°C). If temps drop to 32°F (0°C) or lower, frost damage is likely—even if the tree is mature. For zones 9 or colder, winter protection is a must to prevent leaf burn or dieback.
When should I start protecting my banana tree for winter?
Begin prepping 4–6 weeks before the first frost (usually late fall). This gives time to:
- Prune dead/weak fronds
- Apply mulch (after soil cools)
- Set up windbreaks or row covers
Can I use regular mulch, or do I need something special?
Regular mulch (straw, wood chips) helps, but banana trees need insulation + moisture retention. Layer 4–6 inches of straw or leaves over the root zone, then top with burlap or bubble wrap for extra warmth. Avoid thick bark mulch—it can suffocate roots.
What if my banana tree’s leaves turn brown or black in winter?
Brown/black leaves are a normal stress response to cold, but don’t panic! Prune only the dead fronds in early spring. If new growth appears, your tree is likely fine. For severe damage, wait until spring warmth to assess and trim.
Can I grow a banana tree in a pot and move it indoors for winter?
Yes! Potted banana trees are easier to winter-protect:
- Move to a garage, shed, or sunroom (keep temps above 50°F/10°C).
- Reduce watering (let soil dry slightly between waterings).
- Avoid direct sunlight—bright, indirect light is best.
Wrapping up and next steps
Protecting your banana tree from winter’s chill doesn’t have to be a guessing game—just layer up with mulch, wrap it warm, and give it a cozy shelter. With the right prep, your tropical friend can brave the cold and reward you with lush growth come spring. 🌱❄️
Ready to take action? Start by inspecting your tree now—check for signs of stress, trim any damaged fronds, and gather your mulch supplies. A little effort now means a thriving banana tree when the weather warms up!